Buildkite CI Integration Guide
This document is for open-source community administrators, guiding you through integrating your project with the Buildkite CI system to run CI tasks on Ascend NPU compute resources.
Architecture Overview
┌────────────────────────────────────────────────────────────────────────────────┐
│                        Your Project Repository (GitHub)                        │
│ https://github.com/<org>/<repo>                                                │
│ .buildkite/pipeline.yaml                                                       │
└────────────────────────┬───────────────────────────────────────────────────────┘
                         │ Webhook Trigger
                         ▼
┌────────────────────────────────────────────────────────────────────────────────┐
│                        Buildkite Cloud (buildkite.com)                         │
│   ┌─────────────┐    ┌─────────────┐    ┌─────────────┐    ┌─────────────┐     │
│   │  Pipeline   │───▶│   Queue     │───▶│   Agent     │───▶│    Job      │     │
│   │ Define Flow │    │ Task Queue  │    │  Executor   │    │  Run Task   │     │
│   └─────────────┘    └─────────────┘    └──────┬──────┘    └─────────────┘     │
└────────────────────────────────────────────────┼───────────────────────────────┘
                                                 │ Token Registration
                                                 ▼
┌────────────────────────────────────────────────────────────────────────────────┐
│                       Infrastructure Kubernetes Clusters                       │
│   ┌─────────────────────┐              ┌─────────────────────┐                 │
│   │  CN12-001 Cluster   │              │   HK-001 Cluster    │                 │
│   │   Ascend 910A3      │              │   Ascend 910A2B3    │                 │
│   │  queue: ascend-a3   │              │  queue: ascend-a2b3 │                 │
│   └─────────────────────┘              └─────────────────────┘                 │
└────────────────────────────────────────────────────────────────────────────────┘
Onboarding Flowchart
                       Start
                         │
                         ▼
┌───────────────────────────────────────────────────────────────────┐
│ Step 1: Generate Buildkite Agent Token                            │
│ You: Create Token on Buildkite website                            │
│ We: Provide Token receiving channel                               │
│ Acceptance: Token securely delivered to infrastructure team       │
└────────────────────────┬──────────────────────────────────────────┘
                         │
                         ▼
┌───────────────────────────────────────────────────────────────────┐
│ Step 2: Create Queue                                              │
│ You: Inform organization creator to create queue                  │
│ We: Provide queue naming conventions, deploy Agent on cluster     │
│ Acceptance: Queue shows green Connected on Buildkite website      │
└────────────────────────┬──────────────────────────────────────────┘
                         │
                         ▼
┌───────────────────────────────────────────────────────────────────┐
│ Step 3: Create Pipeline on Buildkite Website                      │
│ You: Create Pipeline on Buildkite, link to GitHub repository      │
│ We: Provide Pipeline creation guidance                            │
│ Acceptance: Pipeline created, linked to the correct repository    │
│      Set name, default branch, pipeline script file path, etc.    │
└────────────────────────┬──────────────────────────────────────────┘
                         │
                         ▼
┌───────────────────────────────────────────────────────────────────┐
│ Step 4: Configure Webhook                                         │
│ You: Get Webhook URL from Buildkite website                       │
│ We: Provide Webhook configuration guidance                        │
│ Acceptance: Pushing code to repo triggers Pipeline                │
│      Configure Webhook in GitHub repository Settings              │
└────────────────────────┬──────────────────────────────────────────┘
                         │
                         ▼
┌───────────────────────────────────────────────────────────────────┐
│ Step 5: Write Pipeline YAML                                       │
│ You: Write .buildkite/pipeline.yaml using template                │
│ We: Provide template and field descriptions                       │
│ Acceptance: Pipeline syntax correct, parses correctly on website  │
└────────────────────────┬──────────────────────────────────────────┘
                         │
                         ▼
┌───────────────────────────────────────────────────────────────────┐
│ Step 6: Validate Integration                                      │
│ You: Submit code, observe Pipeline run status                     │
│ We: Assist with troubleshooting                                   │
│ Acceptance: Job successfully executes on Ascend NPU               │
└────────────────────────┬──────────────────────────────────────────┘
                         │
                         ▼
               Integration Complete
Detailed Steps
Step 1: Generate Buildkite Agent Token
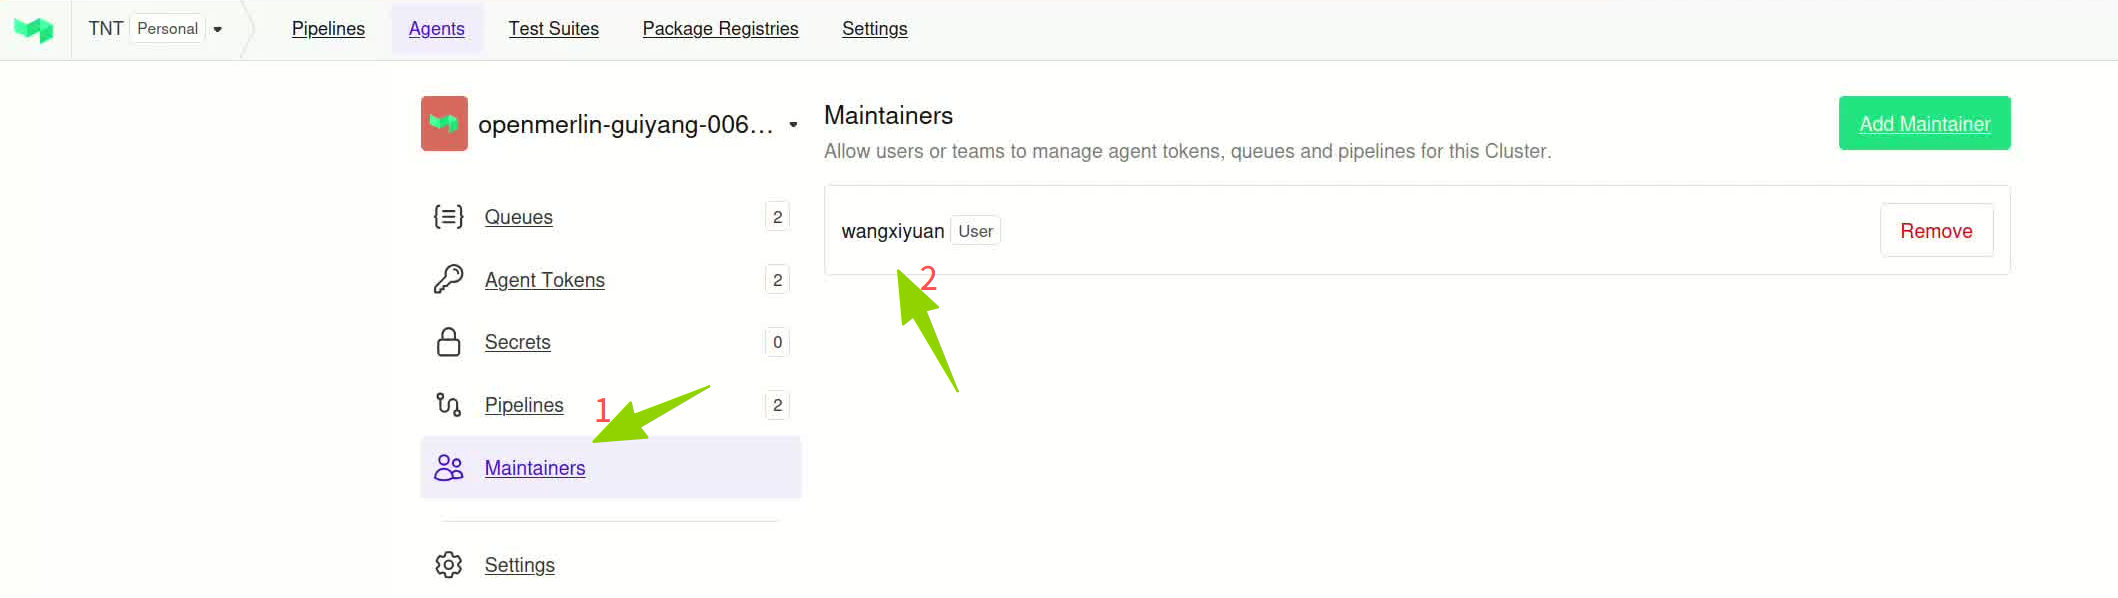
Goal: Create a Token so that the infrastructure team's Agent can connect to your Buildkite organization.
What you need to do:
- Verify your permissions: You must be an Admin or Organization Creator of the Buildkite organization.
- If you are not an admin, contact your project's Buildkite organization creator.
-
To check: Log in to buildkite.com, navigate to your organization, click Settings → Members, and see who has the Admin role.
-
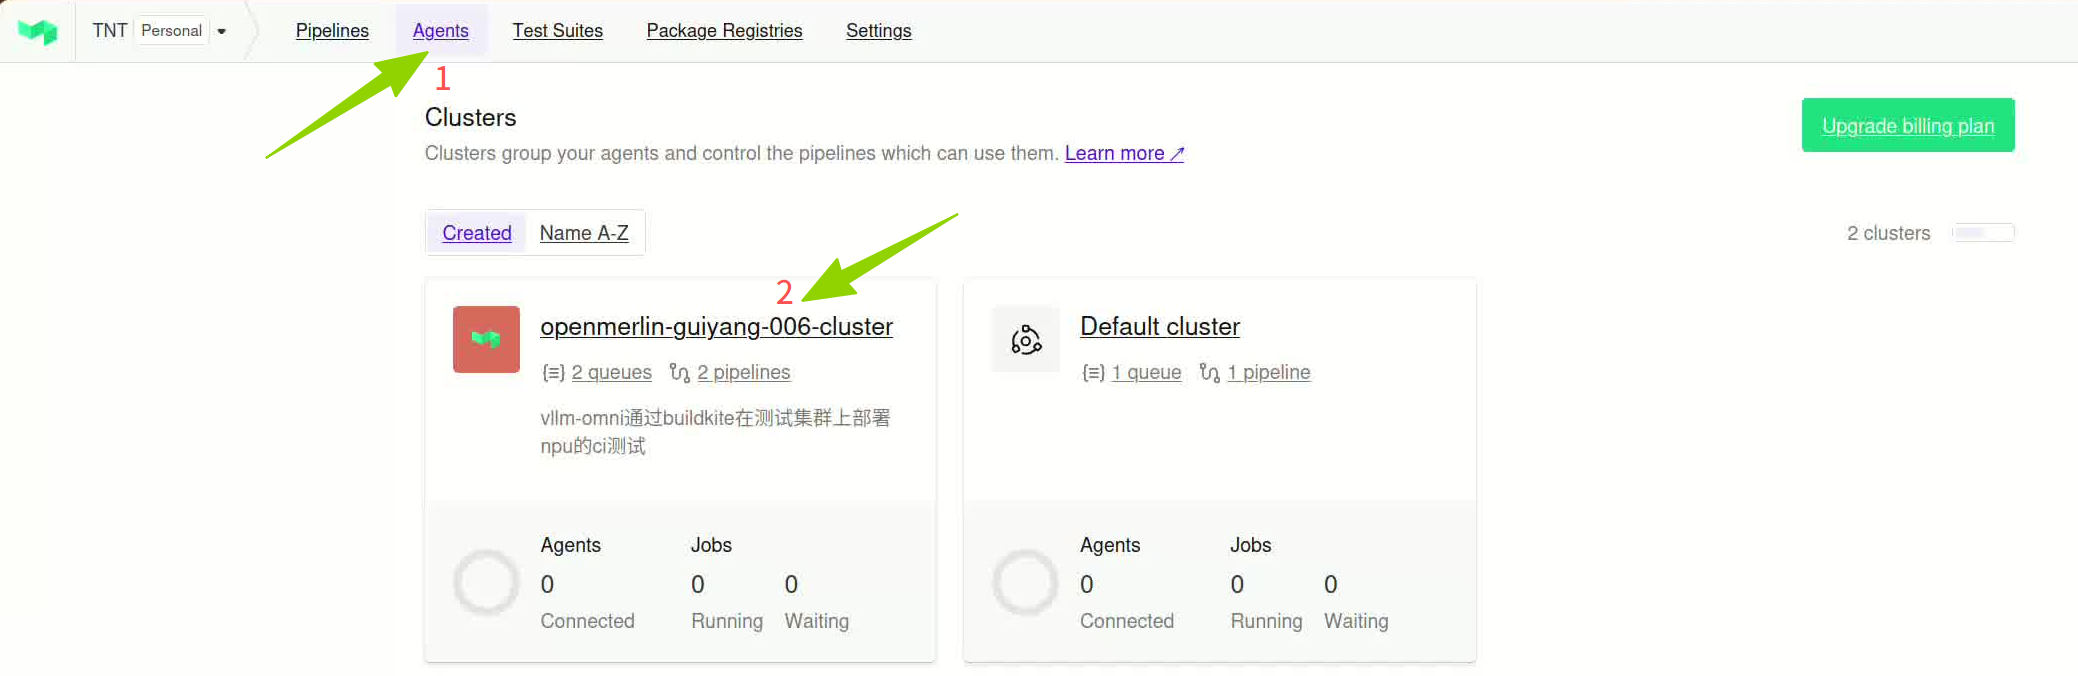
Generate Agent Token:
- Log in to buildkite.com
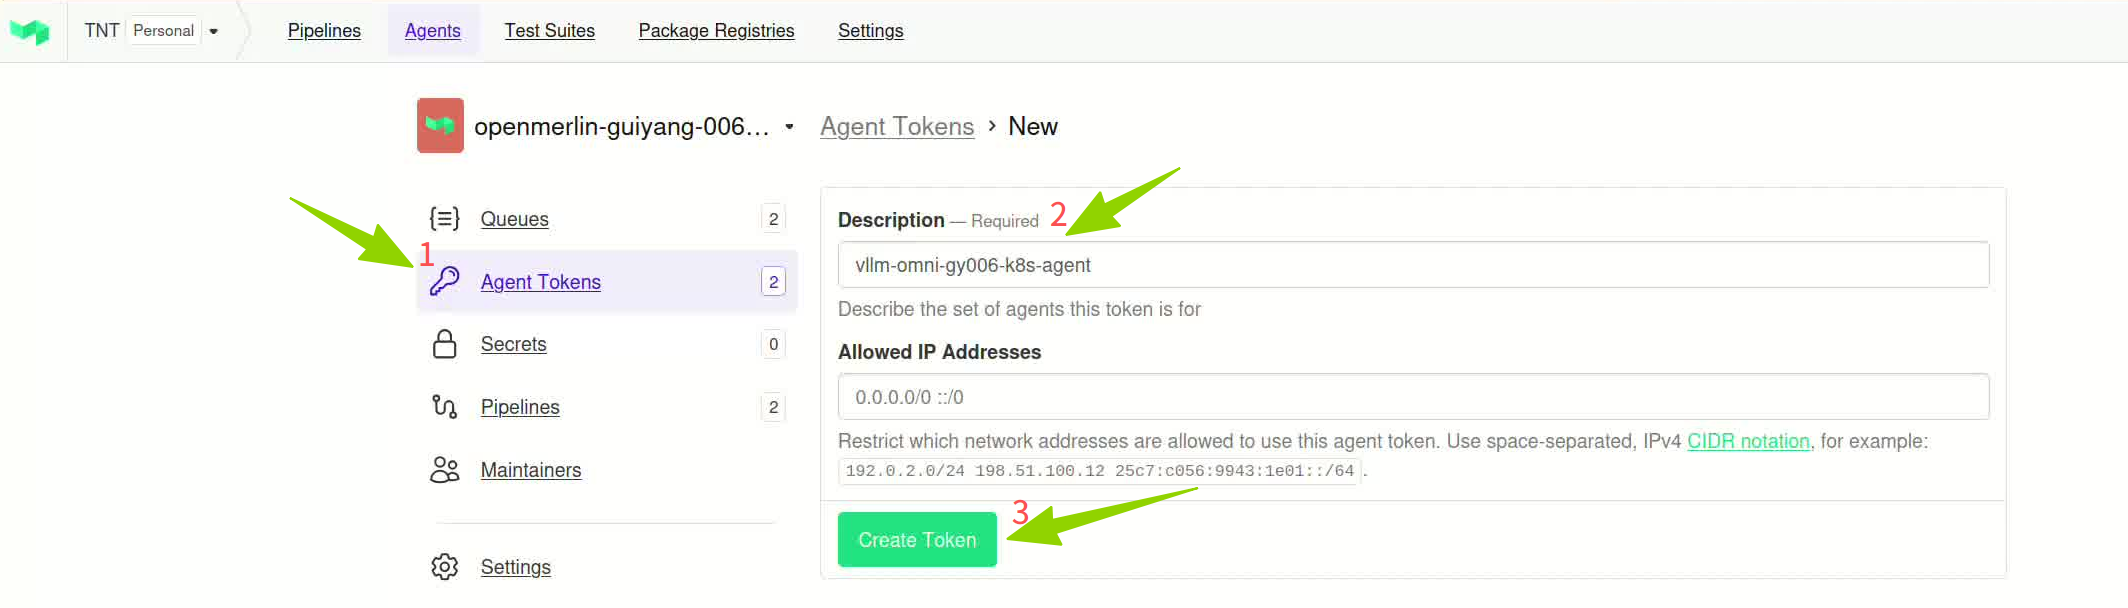
- Navigate to your organization → Agents → Agent tokens
- Click New Agent Token
- Fill in the description with naming format:
<project_name>_<cluster_name>- Example:
vllm_omni_cn12_001,vllm_omni_hk001
- Example:
- Click Create Token
- Copy and save the Token immediately (it is only displayed once and cannot be viewed again after closing)
How to send the Token to us:
For Token security, send email to ascendinfra@huawei.com.
How to verify this step is complete:
- You have securely delivered the Token to the infrastructure team.
- The infrastructure team confirms receipt of the Token.
Step 2: Create Queue
Goal: Create a queue to route CI tasks to the Ascend NPU cluster for execution.
Queue naming conventions:
| Cluster | NPU Model | Queue Name |
|---|---|---|
| CN12-001 | Ascend 910A3 | ascend-a3 |
| HK-001 | Ascend 910A2B3 | ascend-a2b3 |
If your project needs to use both clusters simultaneously, you need to create two Tokens and two queues.
What you need to do:
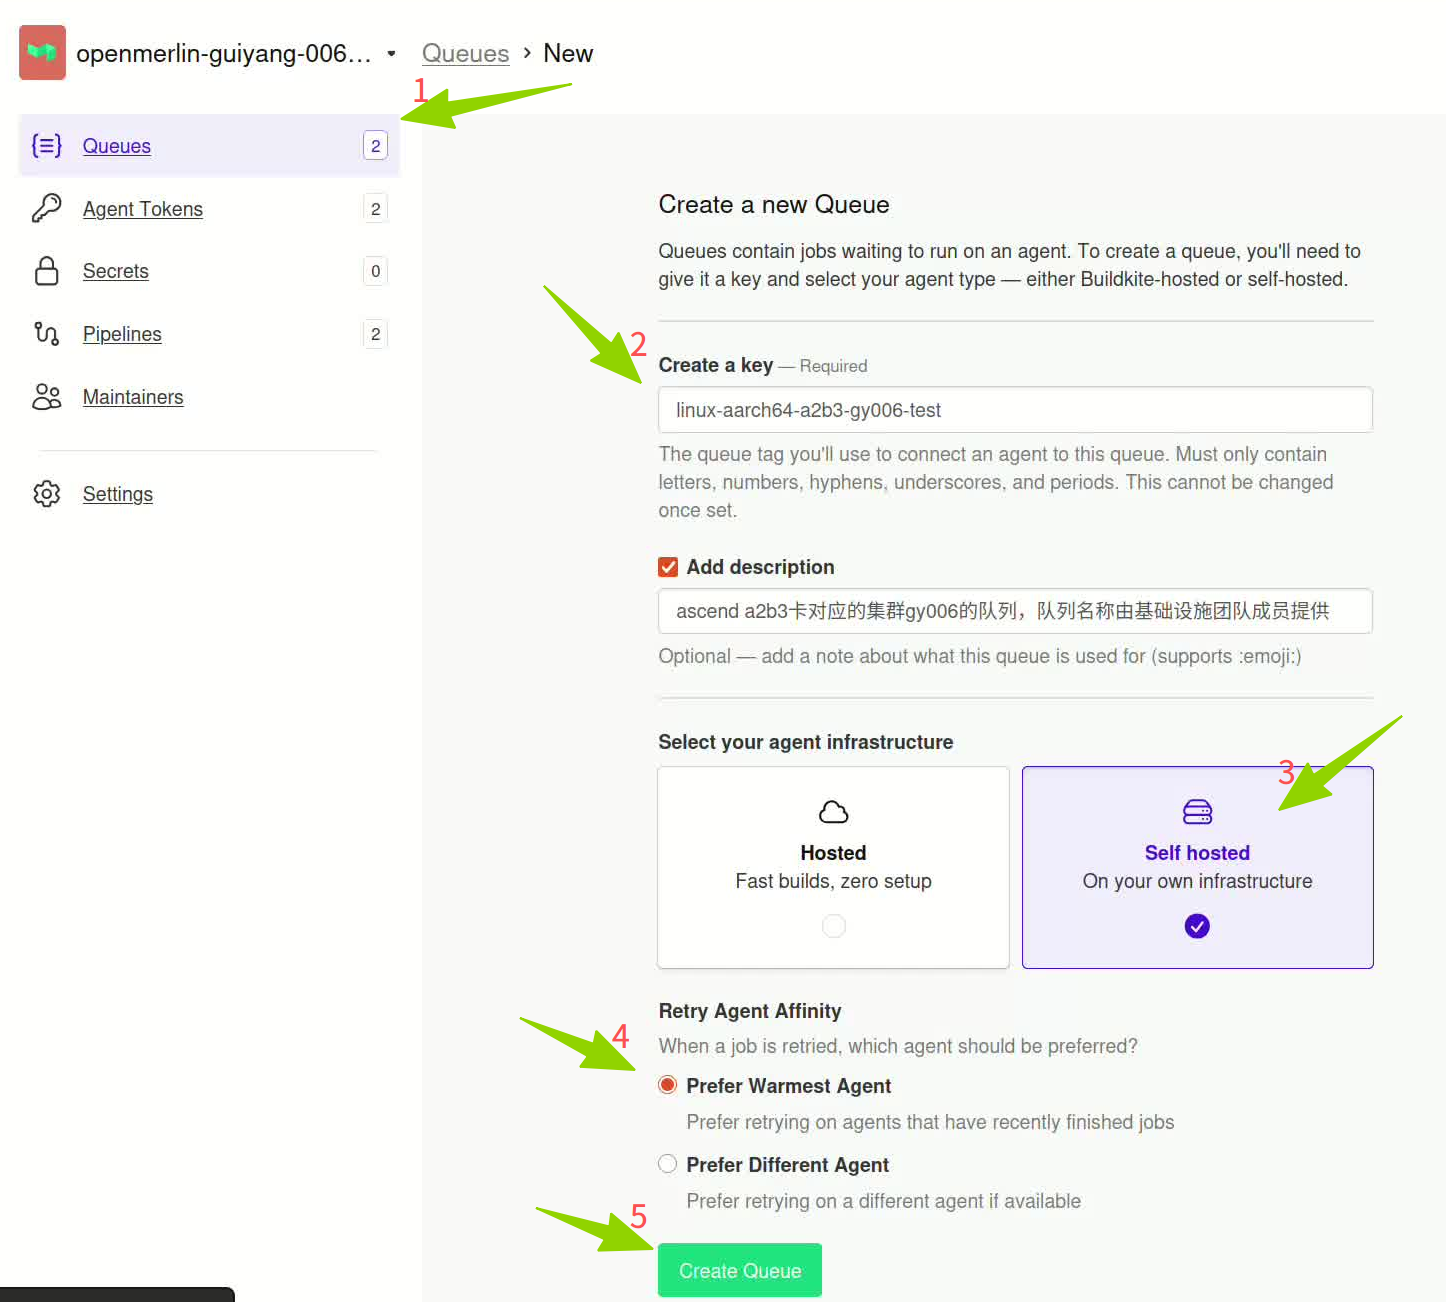
- Contact your Buildkite organization creator (admin) to create a queue on the Buildkite website:
- Navigate to organization → Queues → Create Queue
-
The queue name must use the standard names from the table above (e.g.,
ascend-a3) -
Inform the infrastructure team with the following details:
- Project name
- Git repository URL
- Target cluster (CN12-001 or HK-001)
- Corresponding queue name
- The Token generated in Step 1
What we do:
- The infrastructure team will deploy the Buildkite Agent on the corresponding Kubernetes cluster after receiving the information.
- The Agent will register with Buildkite using your Token and listen for tasks on the specified queue.
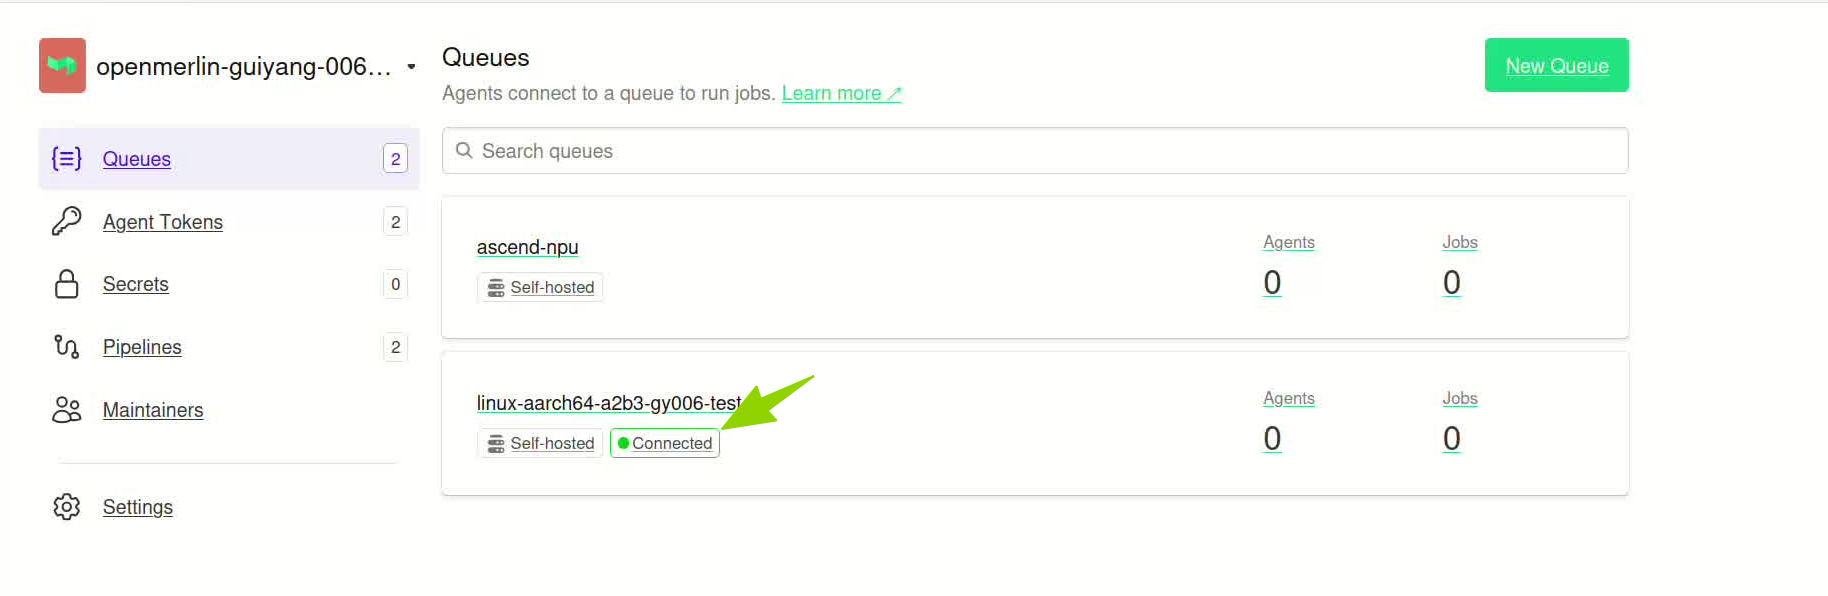
How to verify this step is complete:
- Log in to buildkite.com → navigate to your organization → Agents
- Find the corresponding Queue (e.g.,
ascend-a3) - Check Agent status: Connected column shows a green dot ✅ indicating successful connection
- If it shows gray or red, the Agent is not connected. Contact the infrastructure team for troubleshooting
Queue: ascend-a3
| Agent Name | Version | Queue | Connected |
|---|---|---|---|
| agent-abc123 | v3.80.0 | ascend-a3 | 🟢 ← Green = connected |
 |
|||
 |
|||
| --- |
Step 3: Create Pipeline on Buildkite Website
Goal: Create a Pipeline on the Buildkite website, link it to your GitHub repository, and configure basic settings.
What you need to do:
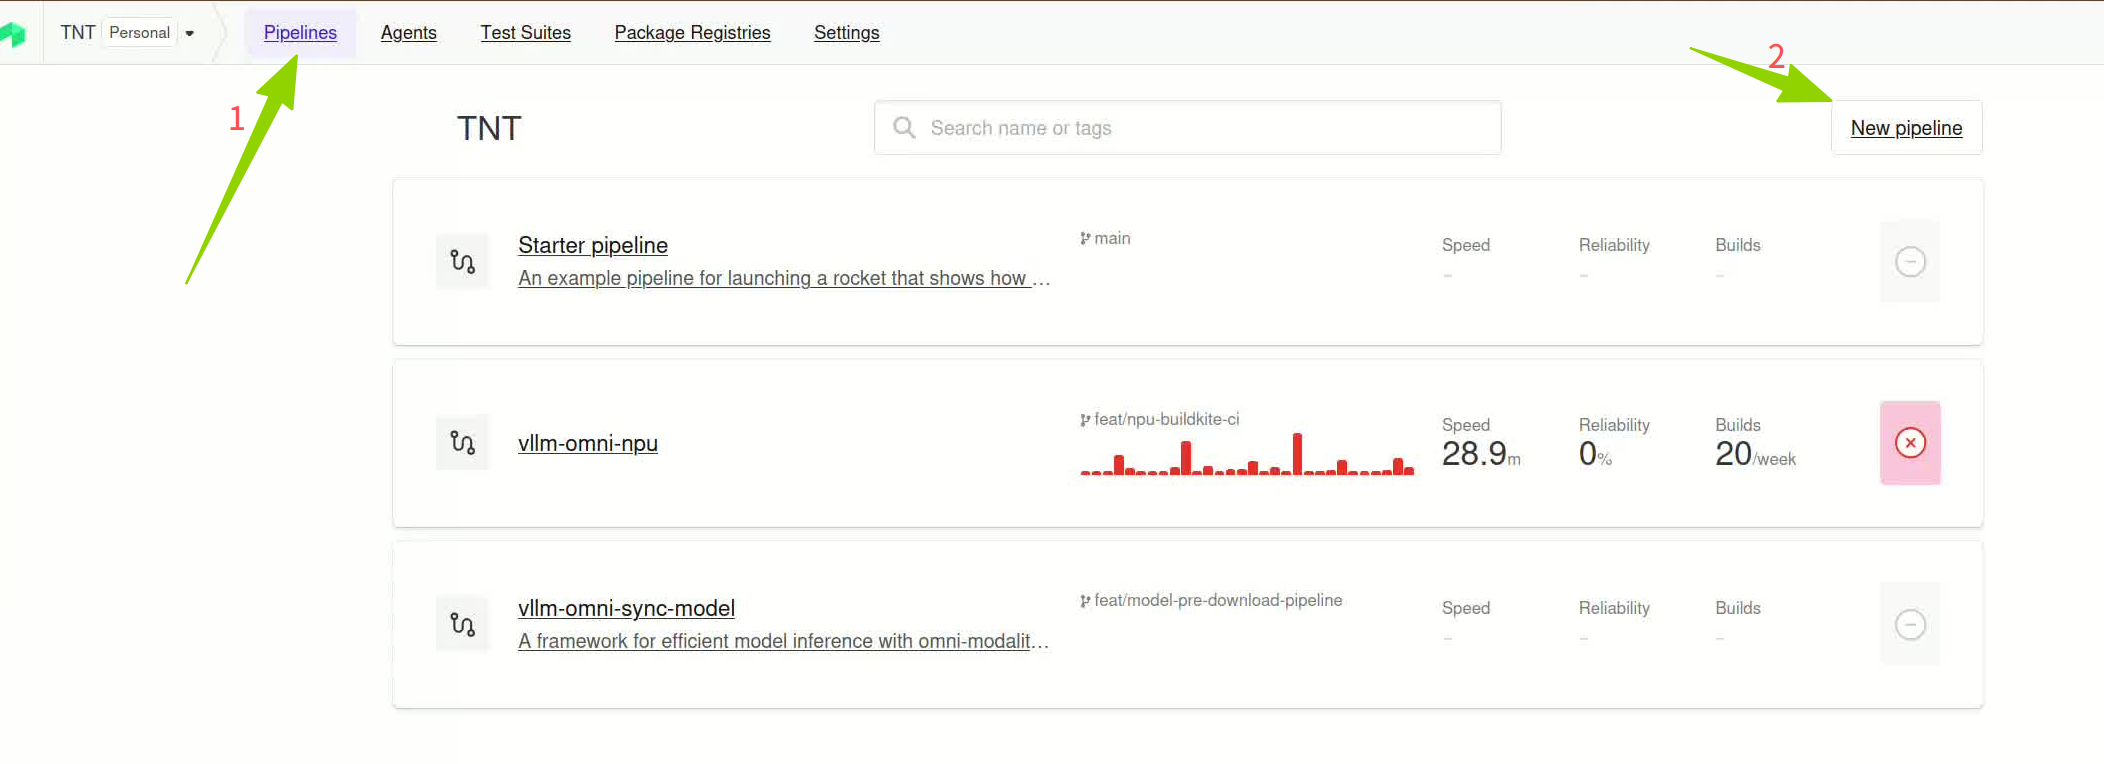
- Create Pipeline:
- Log in to buildkite.com
- Navigate to your organization → Pipelines → New Pipeline
-
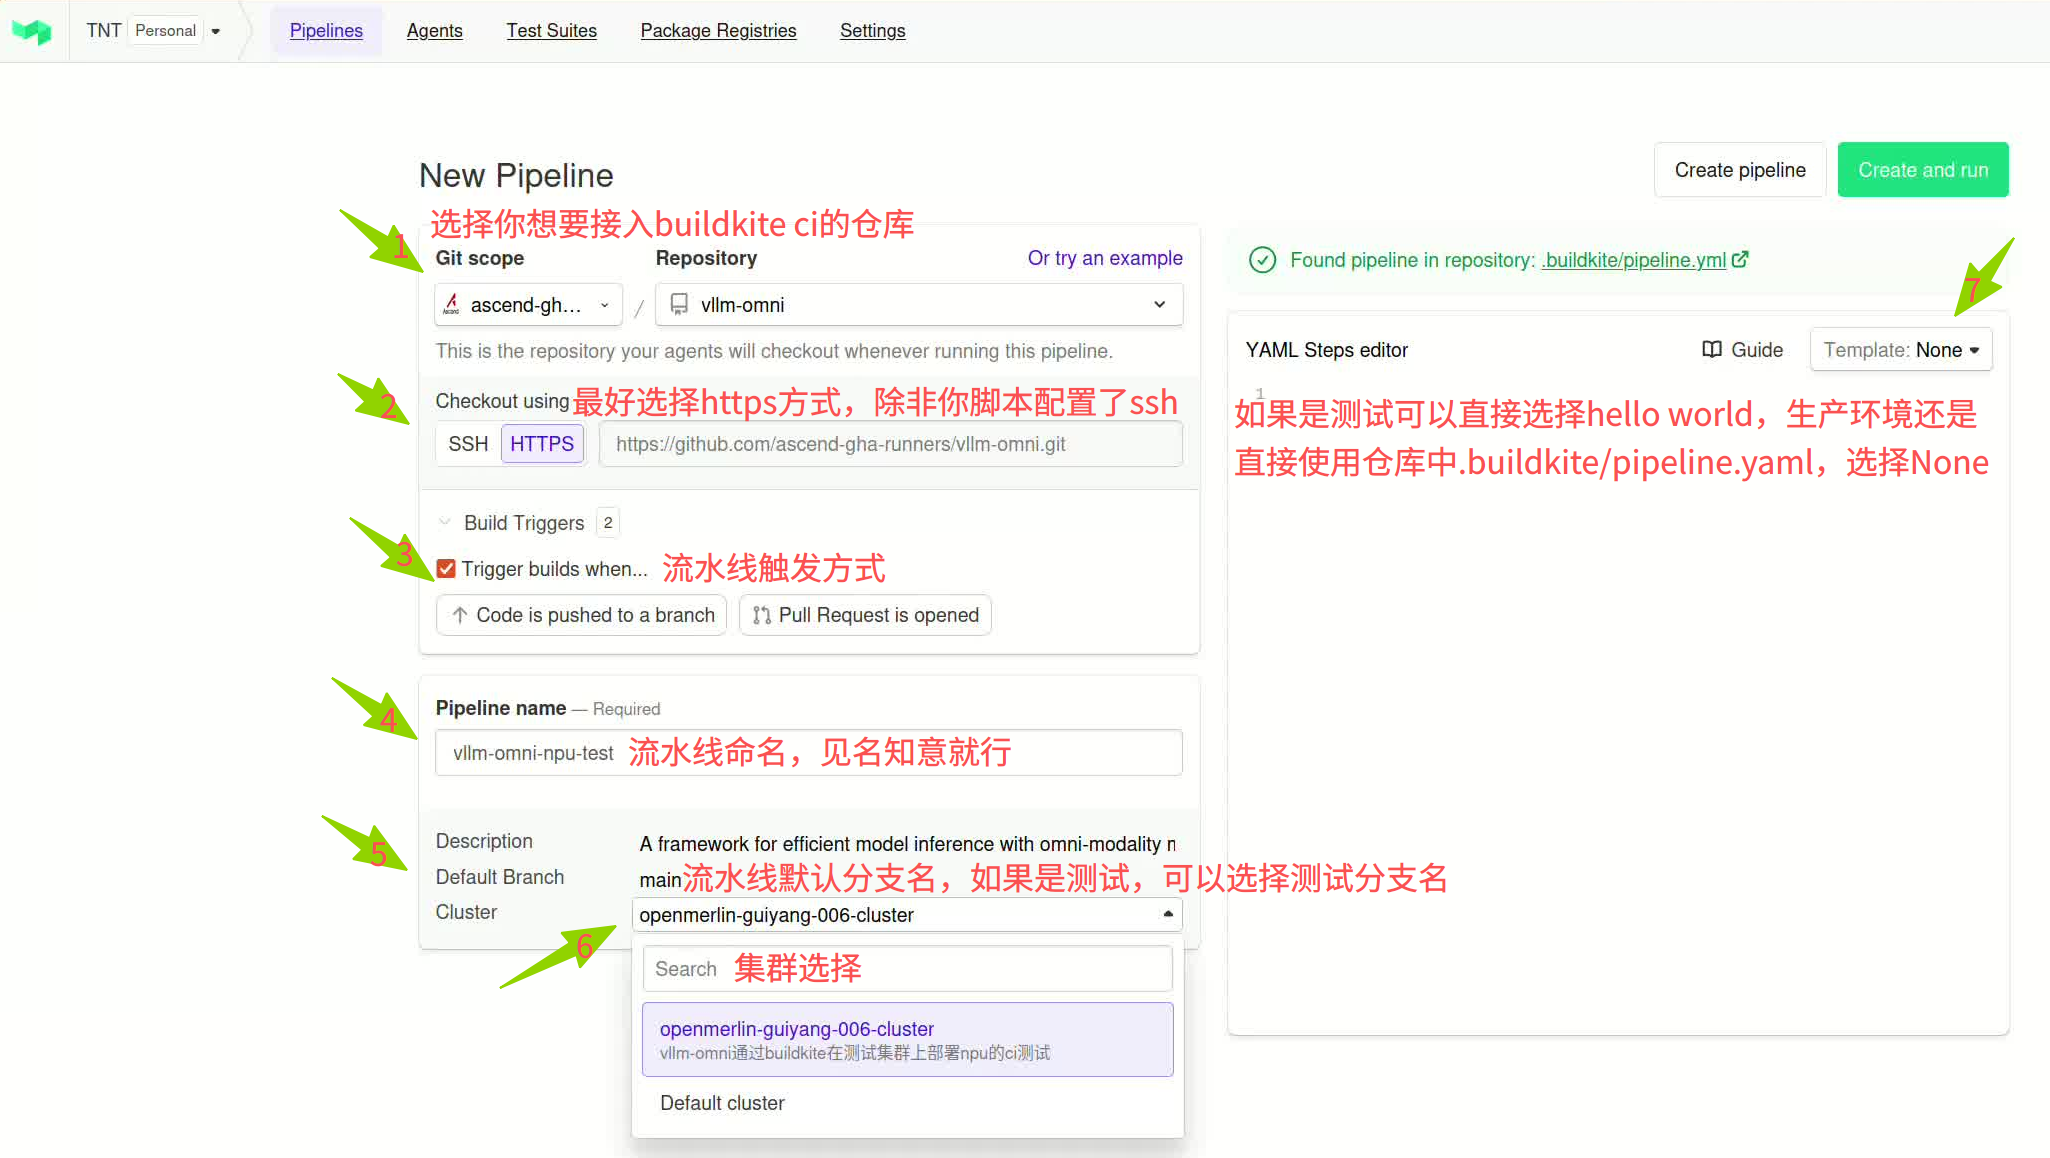
Fill in the following configuration:
-
Pipeline basic configuration:
- Name: Give your Pipeline a suitable name (e.g., project name + purpose, such as
vllm-npu-ci) - Repository: Select or enter your GitHub repository URL (e.g.,
https://github.com/<org>/<repo>) - Default Branch: Set the default trigger branch (e.g.,
main) -
Pipeline Definition Source: Choose to read Pipeline definition from repository
- Select Read pipeline definition from repository
- File path: Enter the Pipeline script file path, default is
.buildkite/pipeline.yml
-
Trigger conditions configuration (optional):
- After creating the Pipeline, go to Settings → GitHub
- Configure trigger conditions:
- Trigger builds on pushes: Trigger on push
- Trigger builds on pull requests: Trigger on PR
- You can choose to trigger only on specific branches or when specific files change
How to verify this step is complete:
- You can see the newly created Pipeline in the Pipelines list on the Buildkite website
- The Pipeline's Repository shows your GitHub repository URL
- The Pipeline's Source shows it reads from repository (
.buildkite/pipeline.yml)
Step 4: Configure Webhook
Goal: Enable GitHub repository events (pushes, PRs, etc.) to automatically trigger Buildkite Pipeline.
What you need to do:
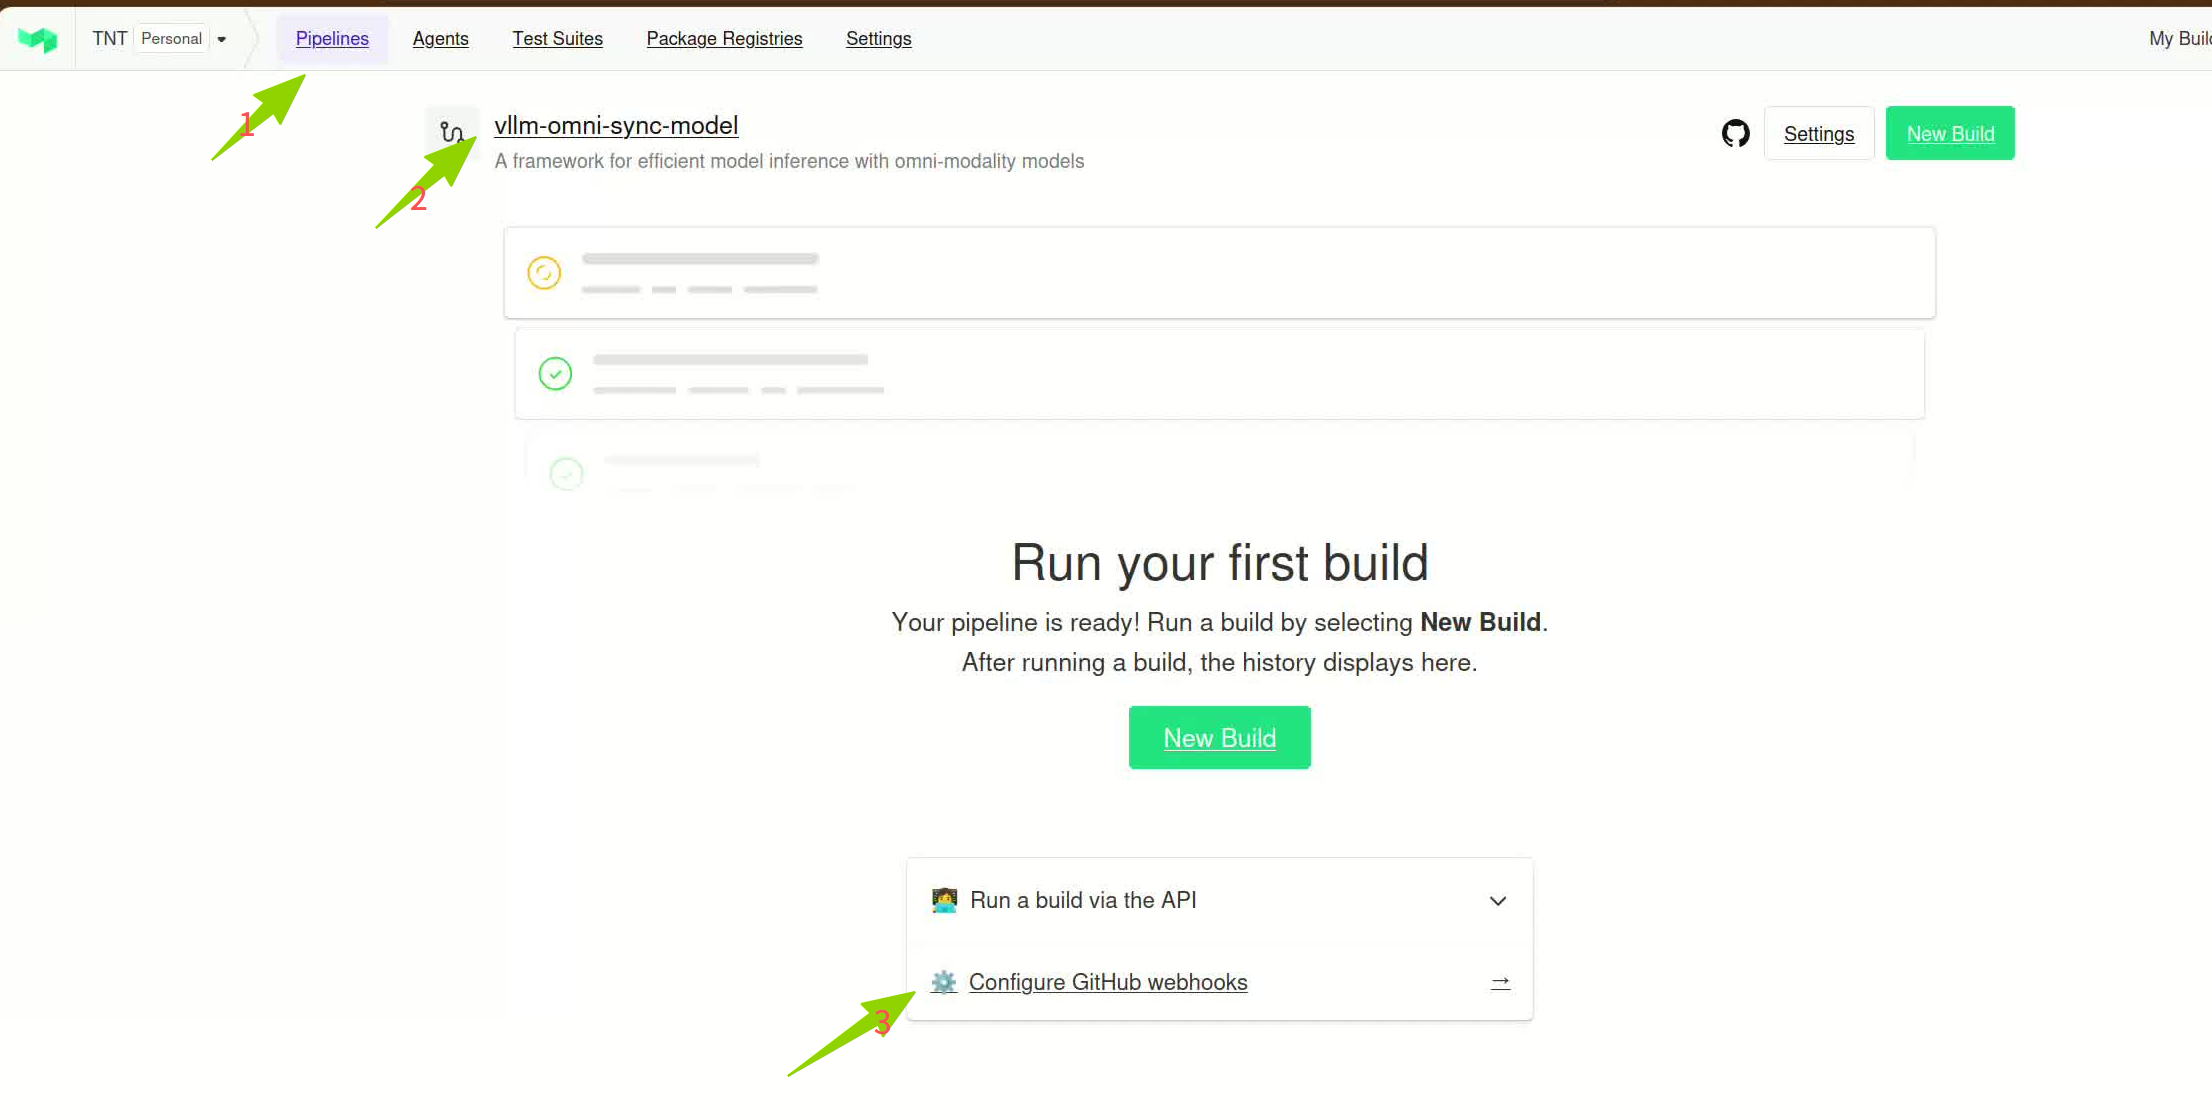
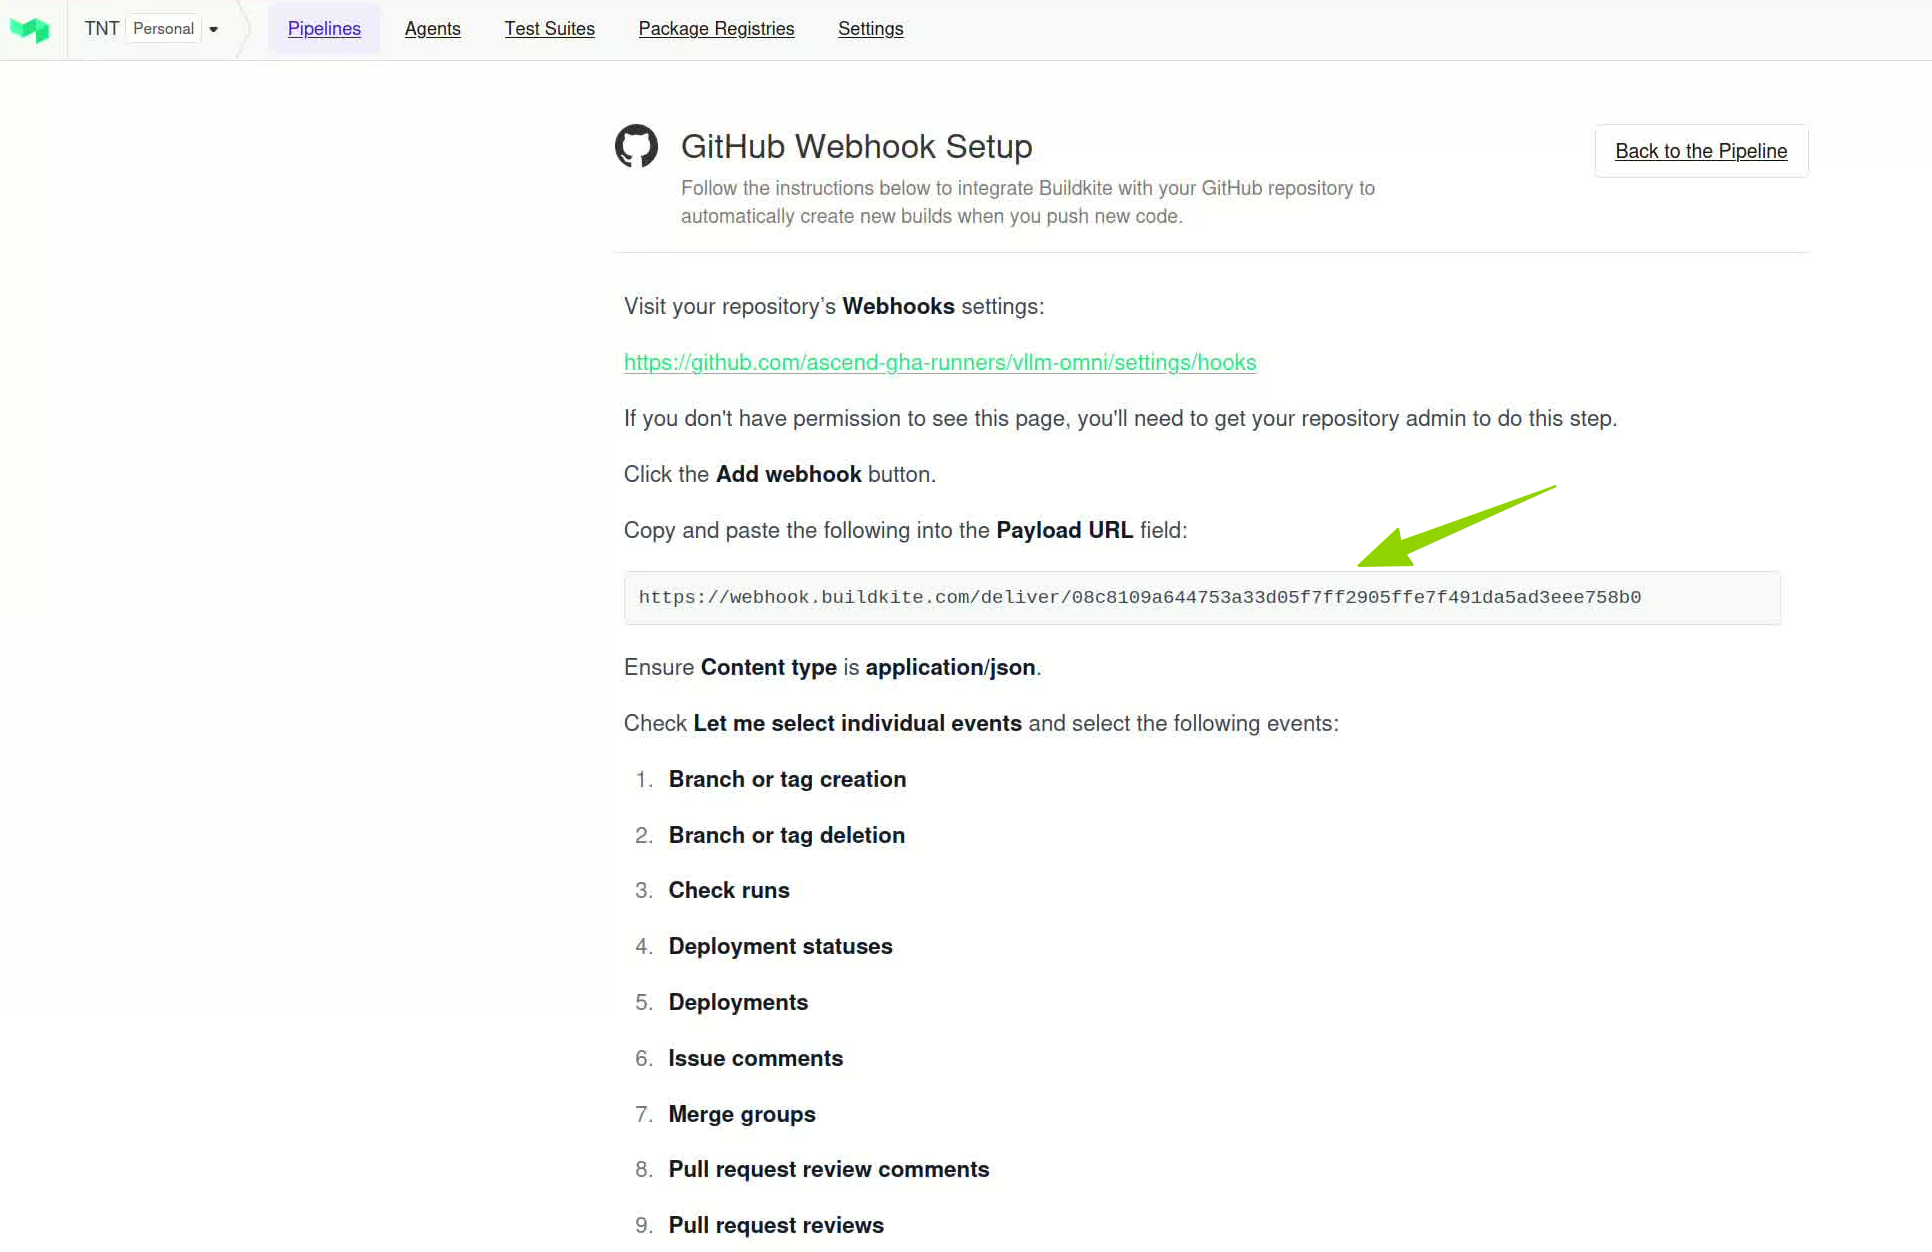
- Get Webhook URL:
- Log in to buildkite.com
- Navigate to your organization → find the Pipeline created in Step 3
- Go to Pipeline → Settings → GitHub
- Find the Webhook URL and copy it
-
Format:
https://webhook.buildkite.com/deliver/xxxxxx -
Configure Webhook in GitHub repository:
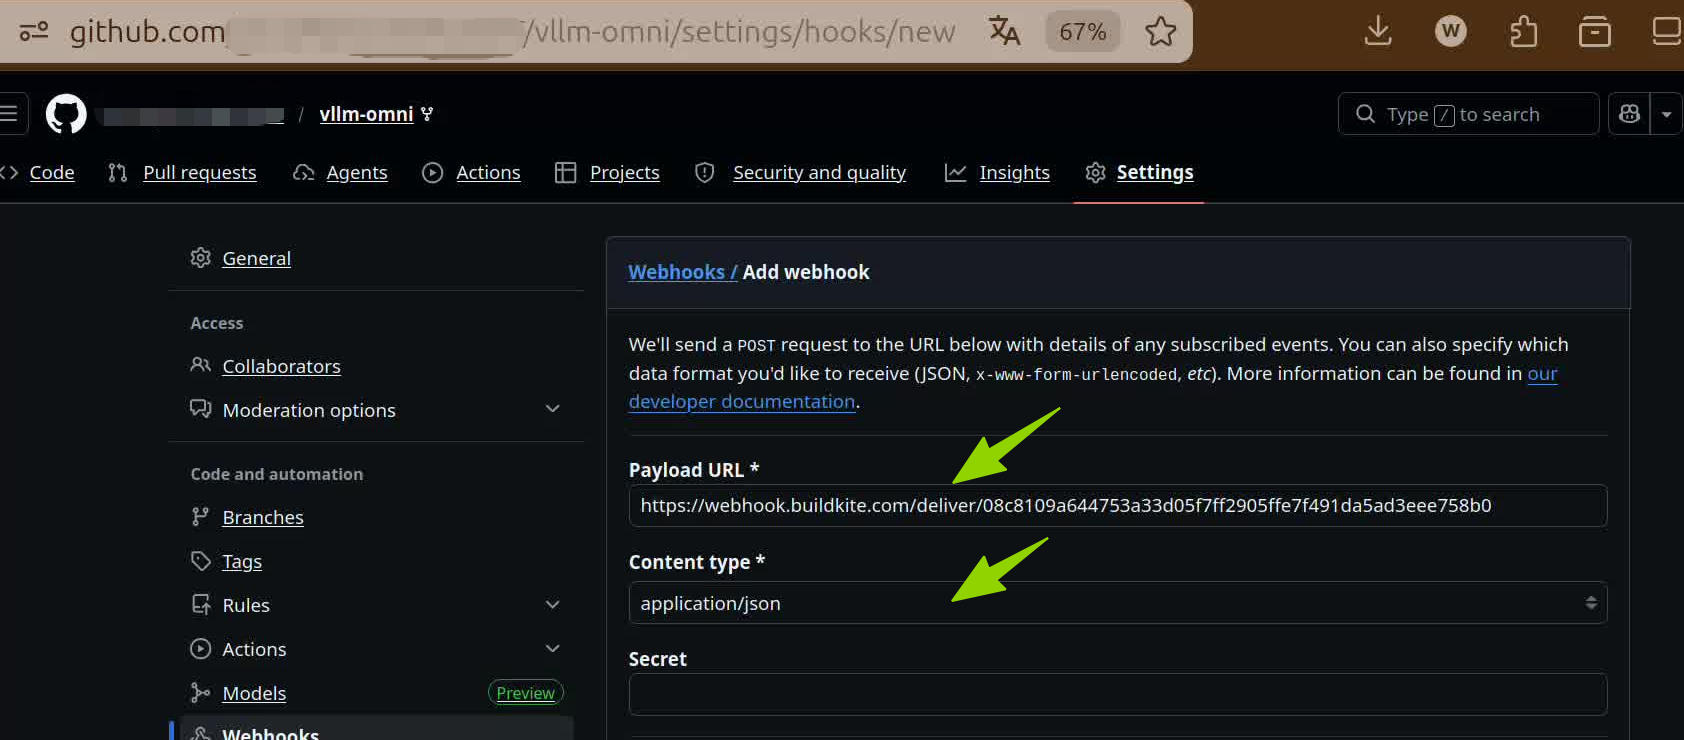
- Open your GitHub repository → Settings → Webhooks → Add webhook
- Payload URL: Paste the Webhook URL from the previous step
- Content type: Select
application/json - Secret: Fill in as required by your team; leaving blank is not recommended for production environments
- Events: Select Let me select individual events, then check:
PushesPull requests
- Click Add webhook
How to verify this step is complete:
- On the GitHub Webhooks page, the newly added Webhook shows a green dot ✅
- Or push a test commit to the repository and check whether a new Build appears on the Buildkite website
Step 5: Write Pipeline YAML
Goal: Define your CI task flow, telling Buildkite what tasks to execute and on what resources.
What you need to do:
- Create a
.buildkite/directory in your project repository root - Create
pipeline.yaml(orpipeline.yml) in that directory - Write your Pipeline following the template below
Pipeline template:
Below is a complete example showing a typical flow of building an image and running tests on Ascend NPU:
steps:
  # Step 1: Build and push image
  - label: ":buildkit: Build and Push NPU Test Image"
    key: image-build
    agents:
      queue: "ascend-a2b3"
      resource_class: "npu-2"
    plugins:
      - kubernetes:
          metadata:
            annotations:
              vault.hashicorp.com/agent-init-first: "true"
              vault.hashicorp.com/agent-inject: "true"
              vault.hashicorp.com/role: ascend-gha-runners
              vault.hashicorp.com/tls-skip-verify: "true"
    env:
      VLLM_IMAGE_TAG: "${BUILDKITE_COMMIT}"
      IMAGE_NAME: "your-project-ci-npu"
      IMAGE_REGISTRY: "swr.cn-southwest-2.myhuaweicloud.com/your-namespace"
      BUILDKITD_ADDR: "tcp://buildkitd-service.buildkitd:1234"
    command: |
      set -ex
      echo "--- Building and pushing NPU Test Image"
      echo "Image: ${IMAGE_REGISTRY}/${IMAGE_NAME}:${VLLM_IMAGE_TAG}"
      # Your image build commands...

  # Step 2: Run tests on NPU (depends on image build completion)
  - label: "🧪 NPU Unit Test"
    depends_on: image-build
    key: npu-test
    agents:
      queue: "ascend-a3"
      resource_class: "npu-2"
    image: "${IMAGE_REGISTRY}/${IMAGE_NAME}:${BUILDKITE_COMMIT}"
    command: |
      set -ex
      echo "--- Running NPU tests"
      pytest -v -s -m 'npu'
Key field descriptions:
| Field | Meaning | Example | Description |
|---|---|---|---|
label |
Task display name | 🧪 NPU Unit Test |
Task name shown on Buildkite website, supports emoji |
key |
Unique task identifier | npu-test |
Used for dependency references between tasks, must be unique within a Pipeline |
depends_on |
Dependency on prior task | image-build |
Specifies which task must complete before this one runs |
agents.queue |
Queue name | ascend-a3 |
Required, specifies which queue to execute the task on, must match the queue name created in Step 2 |
agents.resource_class |
NPU resource spec | npu-2 |
Required, specifies how many NPU cards are needed |
image |
Runtime image | registry/your-image:tag |
Container image used for task execution |
command |
Execute command | pytest -v |
Actual shell command to execute |
env |
Environment variables | KEY: value |
Environment variables passed to the task |
if |
Trigger condition | build.branch == "main" |
Only execute this task when condition is met |
plugins.kubernetes |
K8s plugin config | See template | Used for injecting Vault secrets and other advanced configurations (usually provided by infrastructure team) |
Resource class (resource_class) selection:
| Resource Class | NPU Cards | CPU | Memory | Use Case |
|---|---|---|---|---|
npu-1 |
1 card | 23 cores | 64Gi | Lightweight testing |
npu-2 |
2 cards | 39-46 cores | 128Gi | Standard testing (recommended default) |
npu-4 |
4 cards | 78 cores | 256Gi | Medium-scale testing |
npu-8 |
8 cards | 156 cores | 512Gi | Large-scale testing |
npu-16 |
16 cards | 312 cores | 1024Gi | Stress testing / full testing |
Note:
npu-1andnpu-16are only available on specific clusters. Consult the infrastructure team for details.
How to verify this step is complete:
- Commit
pipeline.yamlto your repository - On the Buildkite website, navigate to the corresponding Pipeline and verify it parses correctly and displays the Pipeline structure
- No syntax errors are shown
Step 6: Validate Integration
Complete validation flow:
- Confirm Agent is connected
- Log in to buildkite.com → your organization → Agents
-
Confirm the Agent under the corresponding Queue shows green Connected ✅
-
Trigger a test run
- Push a code change to your repository (or create a PR)
-
Wait a few seconds and check if a new Build appears on the Buildkite website
-
Observe Pipeline execution
- Navigate to the Build → view Pipeline execution flow
-
Confirm the status of each Step:
- 🟢 Green: Success
- 🔴 Red: Failed
- 🟡 Yellow: Running
- ⚪ Gray: Waiting
-
Confirm task executed on Ascend NPU
- Click any Step to view detailed logs
- Logs should show NPU-related output (e.g., results from
npu-smi info)
Validation checklist:
- [ ] Agent Token has been generated and securely delivered to the infrastructure team
- [ ] Queue has been created with a standard name (
ascend-a3orascend-a2b3) - [ ] Agent for the corresponding Queue on Buildkite website shows green Connected
- [ ] Pipeline has been created on Buildkite website and linked to the correct GitHub repository
- [ ] Webhook has been configured in the GitHub repository and is functioning properly
- [ ]
.buildkite/pipeline.ymlhas been committed to the repository - [ ] After pushing code, Buildkite automatically triggered a Build
- [ ] Job in the Build successfully executed on Ascend NPU
FAQ
Q1: How do I find out who my organization creator is?
Log in to buildkite.com → navigate to your organization → Settings → Members, and look for users with the Admin role.
Q2: What if the Agent connection status is not green?
- Check whether the Token was correctly delivered to the infrastructure team
- Confirm the Queue name matches the queue that the infrastructure team's deployed Agent is listening on
- Contact the infrastructure team to troubleshoot Agent deployment status
Q3: No Build was triggered after pushing code?
- Check whether the GitHub Webhook configuration is correct and if there are recent successful delivery records in the Webhook list
- Confirm the
.buildkite/pipeline.yamlfile path and format are correct - Check whether the Pipeline's Source Code settings point to the correct repository and branch
Q4: How to view task execution logs?
On the Buildkite website → navigate to a specific Build → click any Step → the right panel shows real-time log output.
Q5: What if my project needs to use multiple clusters simultaneously?
- Generate independent Agent Tokens for each cluster (e.g.,
project_cn12_001,project_hk001) - Route tasks to different clusters using different
queuefields in the Pipeline: ```yaml -
label: "Test on A3" agents: queue: "ascend-a3" resource_class: "npu-2" command: ...
-
label: "Test on A2B3" agents: queue: "ascend-a2b3" resource_class: "npu-2" command: ... ```
Feedback & Support
If you encounter any issues during integration, please report them through:
- Open a discussion: https://github.com/ascend-gha-runners/docs/discussions
- When submitting, please provide:
- Project name and Git repository URL
- Issue description and error log screenshots
- Completed steps and where you are stuck
Document version: v2.0
Last updated: 2026-04-28